ROGO's Soil Sampling Robot
Agriculture's Most Accurate Soil Sampling Tool
Watch This For:
- GREAT close-up footage. A very visual introduction to our soil sampling robot
- Narrated by our customers, discussing how robotics reduces 3 types of soil sampling error
- The difference our robot has made for our customers, & our customers’ customers
Drew Schumacher, CEO at ROGO: If you want better data to make better decisions, you’ve got to go ask yourself, “Well how are we collecting this data again?”
Brett Forsberg, Logan Ag: Yeah, I think the whole soil sampling side of things does get overlooked or undersold. And there’s a lot of errors that happen there that guys are not aware of.
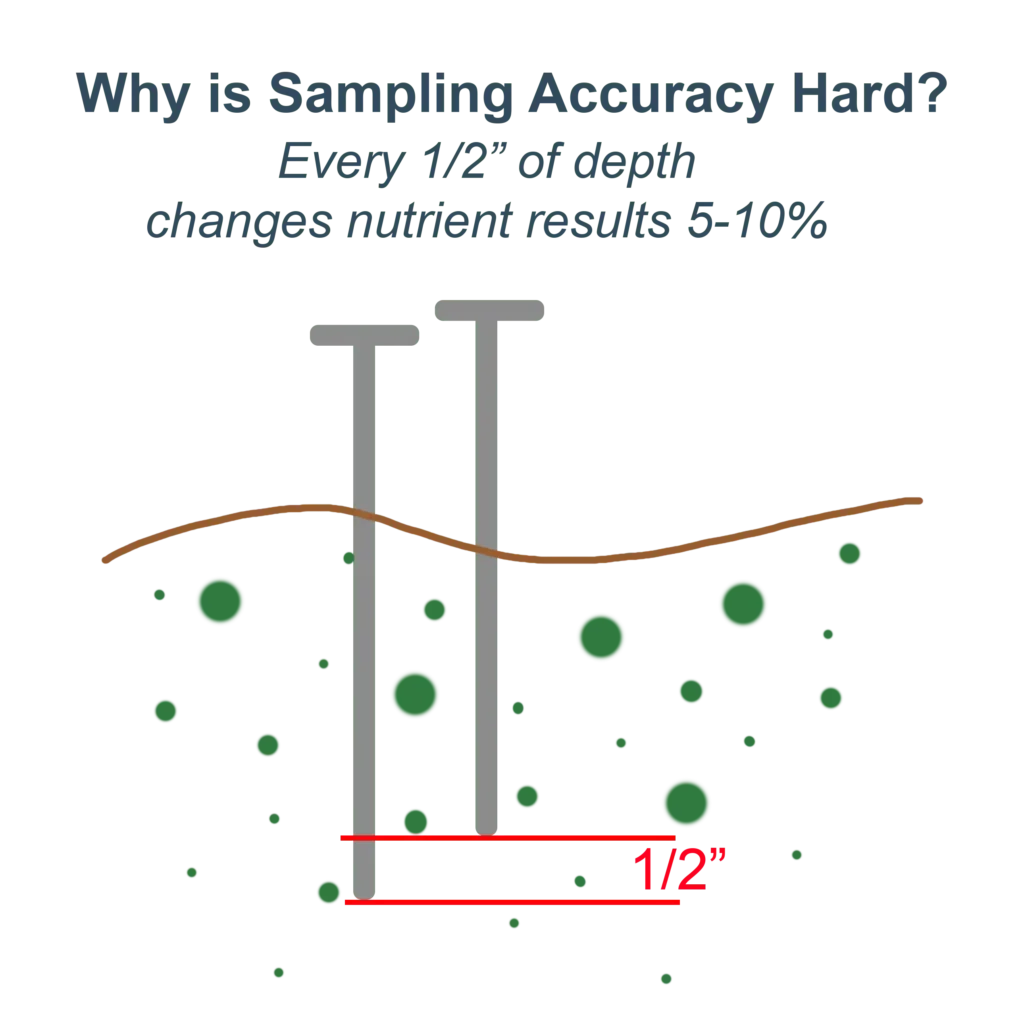
Corey Honegger, Head of Marketing at ROGO: There are 3 main causes of error in soil sampling: error from depth, core quality, & sample location. To reduce depth error and get the right depth within an eighth of inch, ROGO uses a ground reference sampling arm and computer controlled hydraulics that learn from previous cores to apply different amounts of down force in different soil conditions.
Brett Forsberg, Logan Ag: Maybe getting into a wet area where you’re getting three inches of dirt instead of your six or seven, well that really skews what you’re looking at volume of soil-wise in the first place, but then what part of the soil are you actually looking at there? If you’re looking at the very top, that’s different than what the bottom half or third is, so there there can be some big changes there.
Corey Honegger, ROGO: Plus, our custom fabricated probes have teeth on them and they rotate before they plunge into the ground to tear through any crop residue and avoid getting clogged. If it hits rock, it feels that resistance and knows the core failed.
Brett Isley, Growmark: I saw with actually watching the robotic soil sampling tool, that you can see that it was maintaining that accuracy and pulling close to the perfect core every time.
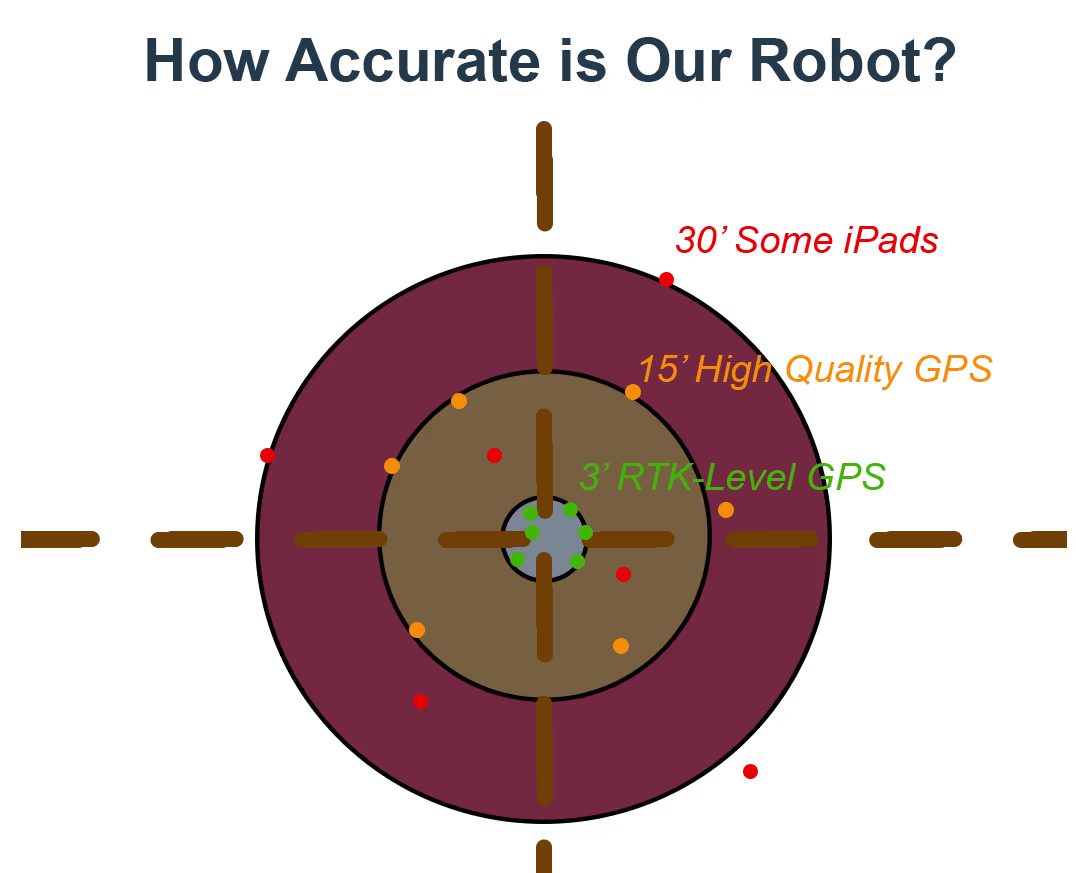
Corey Honegger, ROGO: And, with RTK level GPS and autonomous driving, we’re able to repeat sample locations precisely from year to year to reduce location error.
Kyle Schlechty, Nutrien: Growers have commented on how dedicated ROGO is to the sampling process. They’ve seen them out there late at night, early in the morning. They feel the data has better quality than if we pulled it ourselves.
Brett Forsberg, Logan Ag: The quality of growers and the knowledge that they want and rely upon gets more, what you say, they’re more aggressive about wanting more information and trying to find ways to leverage that information.
Kyle Schlechty, Nutrien: Using ROGO has allowed us to upsell the customer on the quality of our soil sampling, pick up more variable-rate fertilizer acres.
Trent Hall, Farmer: We wanted consistent samples and just the right readings taken on everything and just to have that robot going down the exact spot every single time and going to the exact depth it needed to be, we felt that the accuracy was the best way to go.
Matt Clark, Keystone: We pride ourselves on being on the forefront of technology and this is just another tool to add to the portfolio of core agronomics to be that trusted advisor to our growers.
Key Features (Click for Video & Short Article)


Behind-The Scenes Videos
Robotic Sampling Arm (Designed for Durability & Accuracy)
Sometimes we get asked by people who aren’t familiar with ag why we don’t use a drone to take a so sample. And although it seems pretty simple – we’re just pushing this thing in the ground and pulling it up ending up with a 6-8 inch piece of soil – there’s a lot more to it than that and that’s what we’re going to talk about.
My name is Drew, I have an engineering background, I’m one of the co-founders of ROGO, and I’m going to tell you about how we use our arm to take high quality soil cores every time.
Durability (Frame, guards)
First, in ag everything is about durability. We have to protect against branches when we’re up against a boundary. We have to protect against rocks or any other obstacles that this thing hits. It’s very heavy duty, tied into the frame. Durability is built into every aspect of the soil sampling robot.
This sampling arm right here has sampled over 100,000 acres and we’re actually getting to the point where we’re wearing out the Kubotas faster than our arms. So the reliability is crucial.
Accurate Coring (Augers vs Probe, Crop Residue)
Next, let’s talk about the soil probe itself. When you’re going into the ground the number one problem is residue. And that’s why as a company we started out with an augur so that we could take a core and deal with the residue problem.
However, we learned a couple years in that an augur was taking more soil from the top than the bottom – which is bad. So we pivoted back to a probe and dealt with the residue problem in a different way. Check out another video for that explanation.
Managing Force & Efficiency (2-Stage Motor, Control Valve, Linear Sensor)
So we have this probe getting pushed into the ground, and right now this is very dry soil. Sometimes you need a ton of force, sometimes you don’t. We always want to be moving as fast as possible, so when it comes to our hydraulic system we have a two-stage motor design so that we can toggle between force and speed.
At the end of the day we are still moving very quickly either way, so we have a high-speed control valve that can start and stop these hydraulics very quickly. However, when you’re moving 20 plus inches/second into the soil – that’s really fast – so we have a high precision linear sensor that’s telling us the speed and the position of the probe as it approaches the bottom of the hole.
And it’s moving so quickly that we actually have to calculate what our braking distance is going to be and start stopping gradually as we approach the bottom of the hole. So we nail that within a couple millimeters, then we rotate with our drone motor and come all the way up.
Safety (Sensors, E-Stop)
Lastly, we have safety integrated in the design. We have sensors that know when the bucket and the probe is retracted so that we never are damaging the probe by driving off. We have sensors to know when it’s at the dumping position. And we have an estop system if the operator ever has to inspect anything.
Conclusion
So you have durability, you have accuracy, you have efficiency, you have safety. That, at ROGO, is how we take our soil samples.
Why We Developed Our Own GPS
If I’m a robot I need to know where I am and where I’m going. So we have a GPS antenna in the front and the rear.
I’m Drew, I have an engineering background, I’m one of the co-founders of ROGO, and I’m here to talk about the GPS system and its evolution.
Why We Don't Use An Off-The-Shelf GPS (Anymore)
At ROGO we started out by using off-the-shelf leading solutions for GPS. We wanted something without a base station that had RTK level accuracy and so we used kinematic correction-based solutions.
The problem is some of those solutions just started blowing up and pretending the robot was flying all across the field because of some vibrational patterns in our system. We even brought out engineers from those companies. They tried to solve it and they could not, so we said “Okay we have to solve this and build our own GPS system.”
Basic Setup (Dual-Antenna + IMU)
That GPS system is a dual antenna system, so we know even at resting where we’re pointed. And, it contains an IMU so that as we’re driving we have a high rate stream of corrections telling us where we’re pointed.
Agronomic Benefits (Efficient Driving, Sample Tolerances)
That sets us up to drive well so that we can chart our course efficiently for the next core, and be lined up appropriately so that the core after that is accurately taken.
It also sets us up to record both the location of the robot within an inch, and the location of every single core within an inch, and then check these core locations were taken where they were supposed to be based on tolerances for that sample.
This ensures that every single sample is taken with high accuracy.
Making a Kubota Self-Driving
We Need Mechanical Tie-Ins
Here we are looking at the underbelly of a Kubota looking at the various systems that it takes to make a Kubota drive itself for our soil sampling robot.
My name is Drew, I have an engineering background, I’m one of the co-founders of ROGO.
Kubota is a great machine, but it’s not like a Tesla or an EV that you can just tell it what to do programmatically. We had to mechanically tie in to the system to get it to self-drive. So when we think of driving we have the brake, we have the throttle, and we have the steering. So those are our three different outputs.
Throttle Actuator
To control the throttle we have our throttle actuator that actually just moves the mechanical throttle plate here on the engine. It does not move the pedal up in the cab for the operator.
Steering Valve
Next, we have the steering system. It’s a hydraulic steering system, so we have a controller and a steering valve over here that control directly the steering (left to right) of the system. So if you’re in the cab you wouldn’t actually see the steering wheel spinning around while you’re driving.
Brake
Lastly, we have the brake. The brake is also a hydraulic system and we’ve tapped in directly to that so that when we pull up to a core we can pull that brake, ensuring the robot is anchored so that we can take a high quality core even if we’re on a hill.
System Inputs (GPS, IMU, RPMs)
The auto drive system itself has to then decide what to tell those things to do and it does that using GPS and the IMU system that’s ROGO-designed and we talk about in a different video.
It also takes into account the RPMs of the engine. Now why is that important? Well, if you’re sitting in the cab of a Kubota and you hear the engine starting to bog down you’re going to back your foot off the throttle. Well again, our system’s blind and deaf and so we need to tell it to back off the throttle if it’s bogging down like, if it’s on a hill or if there’s extra mud. That RPM sensor says “Hey I’m bogging down you better back off the throttle rather than just pushing the throttle further because I’m not going as fast as I want to go.”
Steering Algorithms
So all of those inputs are taken into account and then our AutoDrive system uses a lot of different algorithms to say, “Okay I’m driving this way, I want to maintain this speed, I want to be turning this amount;” giving commands to all these three different systems: the brake, the throttle, and the steering valve.
That’s how we make a Kubota drive itself at ROGO.
12 Control Modules That Convert Human Commands into Automated Processes
Controlling a Robot
So for every robot, when you have a human involved you need a way to tell it what to do – that’s what this touchscreen does.
Hey, I’m Drew, I have an engineering background and am one of the co-founders of ROGO.
Compute, Nav, & Wiring Harness
Today we’re going to talk about the control system and human machine interface. So down here we have the compute module, our nav module, and these ruggedized wiring harnesses that connect the compute module to everything (the sensors, power module, etc.).
Cellular & Wifi
It’s also connected to the antennas on top for cellular and Wi-Fi. Because we’re in ag, we have a dual modem system for enhanced reliability of our internet.
Power Module
Like I said, the power module in the back handles the charging of two batteries and runs power to all the various different devices that need it.
Sensors, Arm & Drive
That compute is taking all the sensors and inputs, controlling the arm, doing the self-driving, and it’s also driving this monitor.
Monitor & Diagnostics
Here I have an HMI (Human Machine Interface) where I can control the robot at a very basic level. I can take cores in manual mode for testing, or I can switch to auto and hit go. I have the app where I can see the mission itself, I can adjust mission parameters, I can change robot parameters, and go through my day as an operator and get sampling done.
If there is a technical issue, I can open up the diagnostic panel and see all the various devices and their statuses and figure out what’s going wrong.
E-Stop, Scanner, & Printer
From there I can control the robot, but another way I interface with it is with:
- An estop for safety
- After I fill every bag I’m scanning it, which is adding it to the the digital twin of the box.
- Once that box is full, I can hit print and it prints out the manifest of the samples inside that box. It prints out the shipping label and the check-in sheet for inside the box.
Summary
That in a whole is how the operator interfaces with the soil sampling robot, and how our control system works.
Soil Sampling Robot Gets to True Depth Consistently
Our robot uses a multi-step, ground-referenced depth control system – accurate within 1/8″!


Robot Extracts complete Soil Cores
Once we reach the right depth, we extract 100% of the core every time!
Why is this important?

Incomplete cores are like partial samples – they don’t accurately represent the soil’s nutrient contents.
"Pinch, Probe, Pull"

We use several techniques to pierce crop residue, get the entire core through the inlet and lift it out of the ground.
Scraper & Trapdoor System
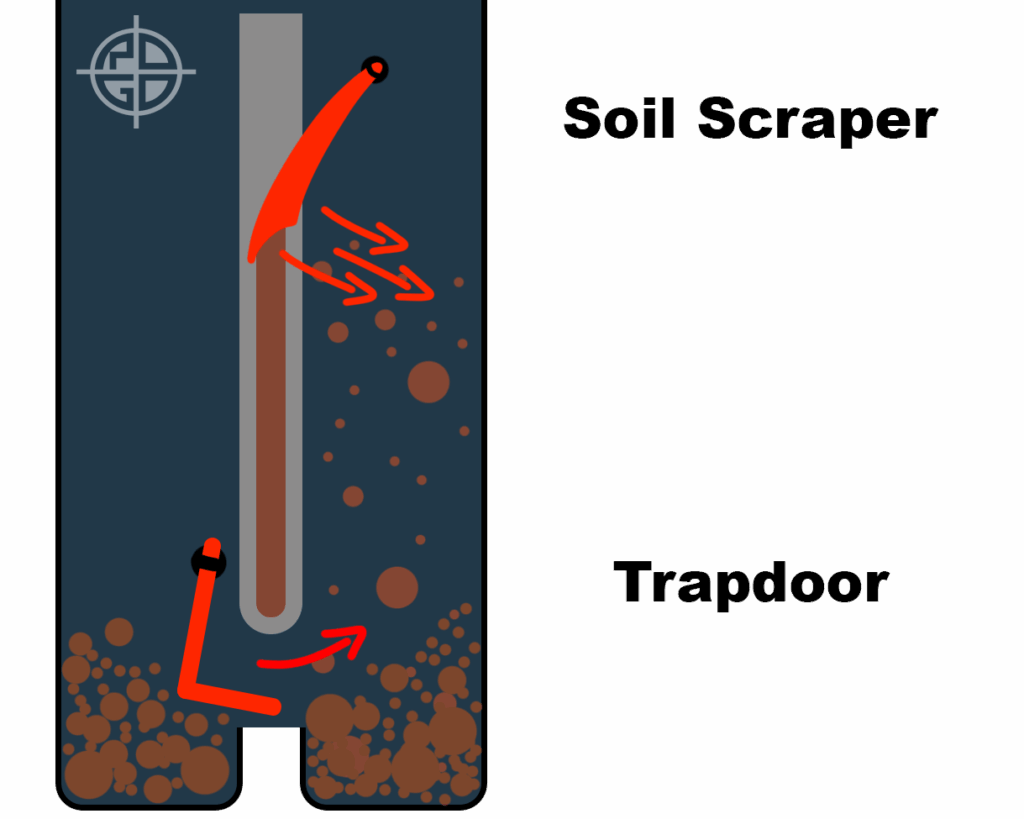
We use a special soil scraper and trapdoor to empty 100% of every core into the bucket – and keep it there.


Extracts From Exact Point Locations
Without An Accurate Location, You can't Repeat Your Grids

ROGO AutoDrive
Our robot drives itself with RTK-level GPS, letting us navigate to and record the location of every core within 3′!


Soil Sampling Robot Automates Process to Avoid Mistakes
Seamless Data Flow

Uses Barcode Labels


Is the Robotic Soil Sampler Really More Accurate?
ROGO's Soil Sampling Robot is the only tool that didn't misapply fertilizer due to sample errors
Beating hand probes, hydraulic probes, and augers, this field trial shows how soil data accuracy can be improved by using a robotic soil sampler. It also shows the financial benefits this can provide to growers.
Learn More
Ask Quick Questions
